Sunday, June 28, 2009

Bilberry Affair


Since I was a girl I have had an ongoing love affair with blueberries. Just as in any love affair I can’t tell you exactly what it is about these berries that I find so much more attractive than say strawberries or raspberries, maybe it’s their dark smooth skin or their lack of noticeable seeds or their tart-sweet flavor. I just know that since the day I ate my first plump blue-purple specimen I have been head over heels about them. In the Julys of my childhood when the berries were at their peak and inexpensive Mom would buy them by the pound at the supermarket or farmers’ market and I would devour them directly from the quart box or in any recipe she and I could find. Mom says that it was at least thirty-five years ago that my love for the little blue buttons inspired her to order some plants for our garden.

Blueberries are native to North America. They belong to the same plant family as cranberries and azaleas. Native Americans used them as a dye as well as food. So why don’t we say,” As American as blueberry pie?”

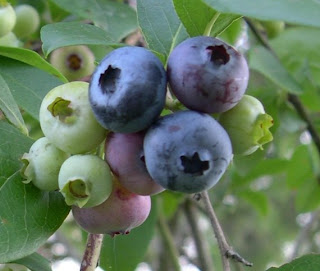
Today there are three types of blueberries in cultivation, the Northern Highbush, the Southern Rabbiteye which grows as far south as Georgia, and the Lowbush which is very cold hardy and grows as far north as the Artic. The Northern Highbush is what Mom ordered for our garden. It is now a six foot tall shrub with shiny green leaves that turn cranberry red in the fall. It is also the sole survivor of that first order and, much to my disappointment, every other order I have planted since.


Usually I am pretty easy going about sharing the fruit we have in the garden and orchard with the birds and wild animals, but not the blueberries. The moment there is a ripe berry on that bush I’m there with the bird net. No darned Mockingbirds are getting any of my blueberries! Since we only have one bush the berries that I harvest from the garden are usually reserved for eating out of hand because they have such intense flavor. I usually buy the blueberries I use in baking. When you buy blueberries look for round plump ones that are not shriveled or moldy.

Here is one of my favorite blueberry recipes.

Blueberry Oatmeal Muffins

½ cup all-purpose flour

½ cup whole wheat flour

1 cup uncooked old fashion rolled oats

½ cup packed brown sugar

2 ½ teaspoons baking powder

½ teaspoon salt

½ cup milk

1 egg, slightly beaten

¼ cup canola oil

1 teaspoon vanilla

1 cup blueberries, fresh or frozen (do not thaw)

½ cup fresh or dried apricots, chopped

2 Tablespoons flax seeds


Preheat oven to 400 degrees. Line 8 regular size muffin cups with papers. In a large bowl stir together flours, oats, brown sugar, baking powder, and salt. In another bowl stir together milk, egg, oil, and vanilla until blended. Add milk mixture to flours and stir just until everything is combined. Stir in blueberries and apricots. Spoon batter into muffin cups. Sprinkle tops with flax seeds. Bake 15 to 20 minutes until a toothpick inserted into the center of the muffin comes out clean. Hot from the oven they tend to fall apart so try to let them cool a bit before eating. They freeze well.


So whether you call them bilberries, whortleberries, hurtleberries, cowberries, or farkleberries I still love them.

Sunday, June 21, 2009

Jammin'


In my lifetime the farm has always had an apricot tree. When I was a girl there was a big tree close to one of my dad’s storage sheds. At least it was big by ten year old girl standards; it had a thick trunk and low, solid, spreading limbs with a green canopy of smooth oval leaves. When that tree was in its declining years my dad found a seed that had sprouted and transplanted it. That’s the tree we have today. The tree must be an heirloom variety because that first tree had to have been planted sixty or seventy years ago. That’s all I know about what kind of apricot it is other than the fact that its fruit makes the world’s best jam.


It’s not every year that our apricot tree produces fruit. Because it blooms so early in the spring more often than not its blossoms get damaged by frost and there is no fruit in June. This year we have apricots. These apricots are truly organic. No chemical fertilizers, no insecticides, nothing but Mother Nature’s own gets on the tree so the apricots are tiny—the average is about the size of a ping pong ball—and covered with freckles and blemishes, not to mention the occasional worm or insect. In appearance alone they are apricots only a mother could love but what they lack in beauty they compensate for in flavor. These little golden orange nuggets are packed with the perfect combination of sweet honey flesh that has an acidic lemony finish. This is the apricot taste I have used as a standard for every other apricot I have eaten in my life. The large lovely apricots you can find at supermarkets and even farmer’s markets are bland and flavorless in comparison.


When the apricots ripen it’s a marathon of picking, cleaning, pitting, and cooking jam. Each morning this week I took my five gallon bucket out to the apricot tree and began collecting fruit. The thermometer was hovering in the 80s and the humidity was also about 80 percent so I started on the sunny side of the tree and worked my way into the shade. The soft thud of apricots dropping from the limbs and bouncing off the grass mingled with the scolding of the mockingbird above me. As sweat rolled down my face and dripped off my nose I was careful not to step on half eaten fruit that was the local raccoons’ and ‘possums’ midnight snacks. Eventually I collected all the fruit that was ripe that morning and happily headed indoors to clean and pit my harvest. A couple of hours and a few hundred pits later I was ready to cook jam.


Apricot Jam

8 cups of pitted apricots (peaches or plums work too but remove the skin)

6 cups of sugar

2 cinnamon sticks

Prepare about 6 half pint jars, lids, and rings according to package instructions that came with the jars.


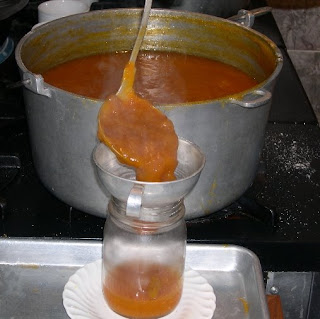
Put all the ingredients in a large pot over low heat. I use grandma’s soup pot. Stir the pot until the sugar has dissolved completely then turn up the heat to medium high. Stir constantly after mixture begins to boil. Cook and stir until mixture thickens, about 15 minutes. You can test the consistency by dropping a tablespoon of jam on a cold saucer. When the jam cools it should hold its shape, not run on the saucer. Jam should have a soft consistency, not like jelly.


Turn the heat down to low so the jam is very hot as you ladle it into the jar. Wipe the rim of the jar with a clean damp cloth, put the lid on and screw the ring on until it is just snug. You can let the jars cool at this point and keep them in the refrigerator or freezer. Because I don’t have the refrigerator space for fifty plus jars of jam I put then in my pasta pot with a stainless perforated liner and steam them for 5 to 7 minutes. It’s easier and quicker than covering them and boiling them in water the old fashion way. You can keep the sealed jars a year or more in a cool, dry, dark place.

There have been years when we had so many apricots I tried every method I could think of to preserve them. I’ve tried freezing, drying, and pickling but jam is still the hands down favorite. Apricot jam has become my secret ingredient. I use it mixed with soy sauce and garlic as a glaze for chicken, as the sweetener in my coleslaw vinaigrette, in place of some of the sugar in my French apple pie, to sweeten my morning yogurt--well you get the idea.


A couple of years ago I discovered a seed that had sprouted under this tree too. I scooped it up and planted it in a very large pot next to its momma so it would be safe from the lawn mower until it got bigger. This year it’s at least a foot tall…so the circle continues.

Monday, June 15, 2009

Strawberry Dreams


I have a vague and very dreamlike early childhood memory. In my four year old mind it was nighttime, but actually it was pre-dawn, and I am sleepily riding in my aunt’s old 1949 Dodge sedan. My Mom and my aunt are in the car; one is driving and the other is whispering to me in reassuring tones. The moist early morning air circulates the overwhelming smell of fresh picked strawberries around us. The newspaper covered back seat is stacked with trays of strawberries, twelve quarts in every tray, each quart carefully “topped”—arranged with the nicest looking berries on top. We drove for what seemed a long time in little girl perspective and arrived at a two or maybe three story brick building that had loading docks and old wooden garage doors. Maybe I fell asleep at that point because that’s all that I remember. Later my Mom explained that we were taking the berries to the commission house in East St. Louis to sell them to the produce broker.

My maternal grandfather called himself a truck farmer which meant that in addition to growing the usual grain crops of corn and wheat he also grew fruits and vegetables to sell to the produce market. My Mom and aunt grew up picking berries from their father’s strawberry field which was at least an acre of land. Let me describe an acre in a size we can all understand better, an American football field is 1.3 acres. That’s a lot of strawberries and a lot of bending down to pick them! These berries were not at all like the hard fleshed strawberries that we find almost year ‘round in supermarkets now. Homegrown strawberries define the word perishable. When they are ripe they have juicy, soft flesh that is deep red through to the core and intense berry flavor. They also crush and mold easily hence the need for daily picking and pre-dawn trips to the commission house.


That’s why the strawberry patch in my garden is tiny by my grandfather’s standards. It’s just big enough to yield berries for the family. For a few short weeks every spring we have them fresh with breakfast, sliced and sugared on shortcake, baked in strawberry rhubarb pie, or if it’s a bountiful year, preserved in a few jars of jam.

Last spring when I told my new husband, Dave, that I was going to make shortcake with fresh berries for dessert he said,

“I don’t really care for strawberry shortcake.”

My mouth dropped open and I must have looked at him like he had just grown a set of green ogre antenna.

“What do you mean you don’t care for strawberry shortcake?” I asked incredulously.

He went on to explain that the only shortcake he had ever had was the yellow sponges sold in the supermarket next to the strawberries. I set out to educate the poor man on the subject of homemade shortcake. I was a girl the first time I baked shortcakes. Mom handed me the box of Bisquick and told me to follow the instructions for shortcake on the side of the box. Everything turned out fine; after all shortcakes are just sweetened biscuits. In the years since then I have experimented with other recipes and have discovered that a scone recipe works great with sliced berries and whipped cream.


This image is the facing page of a paperback recipe book that belonged to my Grandma Emma. It is titled All About Home Baking. It was published by the consumer service department of the General Foods Corporation. Its fourth edition copyright is October of 1941. Of course each recipe uses at least one General Foods product!

Speaking of paperback recipe books my favorite shortcake recipe comes from a small paperback book called Simply Scones by Leslie Weiner and Barbara Albright. I have had this book since it was newly published in 1988 but now it is more like a folio with an outside cover that has separate spotted and yellowing pages that are only in order because there are numbers at the bottom of each.


The book calls this recipe “Classic” Cream Scones and I have only tweaked it slightly.

Strawberry Shortcakes with Dried Blueberries

The strawberries:

2 quarts of fresh strawberries --home grown if you can get them

1/3 cup granulated sugar


The cakes:

2 cups all purpose flour

¼ cup granulated sugar

2 teaspoons baking powder

1/8 teaspoon salt

1 ½ teaspoons grated lemon peel

1/3 cup unsalted butter, chilled

½ cup heavy (whipping) cream

1 large egg

1 ½ teaspoons vanilla extract

½ cup dried blueberries

Wash, hull and slice the strawberries, put them in a large bowl and sprinkle the sugar over them. Stir and refrigerate while you make the shortcakes.

Preheat the oven to 425 degrees. Lightly butter a baking sheet.
In a large bowl, stir together the flour, sugar, baking powder, salt, and lemon peel. With a pastry blender, cut in the butter until the mixture resembles coarse crumbs then mix in the dried blueberries. In a small bowl, stir together the cream, egg, and vanilla. Add the cream mixture to the flour mixture and stir until combined.
Scrape the dough onto a lightly floured cutting board and divide into eight equal pieces. With lightly floured hands shape each piece into a round, large biscuit shape. Place them on the prepared baking sheet. Bake 13 to 15 minutes, or until lightly browned. Remove the baking sheet to a wire rack and cool for 5 minutes. Using a spatula transfer the cakes to a wire rack to finish cooling.
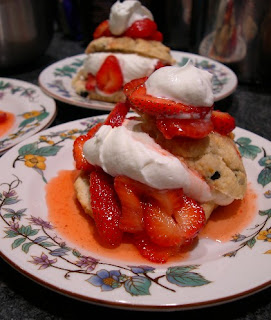
To serve, split each cake in half horizontally. Put the bottom half on a plate and spoon the sliced berries and some of the juice on top. Spoon some softly whipped cream (either home made or from the can) on the berries. Top with second half of cake and a little more berries and cream.


P.S. Dave has changed his mind about strawberry shortcake.

Monday, June 8, 2009

Lovely Lettuce


Eating dinner outside is one of the greatest gifts of spring. When dinner is a large salad with fresh garden lettuce it’s even better. After dinner, if your husband happens to snap a photo of you smelling the wisteria and it looks like a Maxfield Parrish print … that’s the whipped cream on dessert.


Every January I order at least one package of my favorite lettuce seeds, the spring mix from The Cooks Garden. By late winter the thought of plucking those delicate green leaves from my garden and tossing them into the world’s freshest salad captivates me. Every March I hold the package in my hand and read the planting instructions on the front of the envelope.

“Lettuce can be planted as soon as the soil is workable in early spring” it says.

I know that lettuce is a cool weather crop and that seeds will germinate in soil as cold as 40 degrees. It’s the as soon as the soil is workable part that gives me problems. It seems that my soil and the weather work against me. If the soil isn’t frozen then it is usually far too wet to plant in late March. But this year there was a three day window where conditions were perfect and I got those lettuce seeds in the dirt!


We have been enjoying our fresh garden lettuce for the past few weeks and if my second planting of more heat tolerant varieties does as well as the first we will be in lettuce at least another month. So how do I dress this lovely bowl of delicate leaves? Usually simple balsamic vinaigrette is an honest highlight to a salad but when I crave more verdant intensity I turn to Green Goddess.

The legend has it that Green Goddess dressing was invented at the Palace Hotel in San Francisco in 1923 for a banquet in honor of stage actor George Arlis who was staring in the hit play Green Goddess. I think the dressing is a hit but I tend to ad lib with the original ingredients.


Green Goddess Dressing

¾ cup fresh parsley sprigs, packed

1/3 cup light but REAL mayonnaise

3 Tablespoons light sour cream

3 Tablespoons plain yogurt

2 Tablespoons sliced green onion

1 Tablespoon cider vinegar

1 Tablespoon fresh lemon juice

1 Tablespoon chopped fresh basil

2 teaspoons anchovy paste

1 clove garlic, halved or quartered


I play fast and loose with the ¾ cup parsley. I add most every green I have in the herb garden. Parsley is still the major element but I have been known to add fresh dill, cilantro, sage, oregano, and tarragon in varying amounts depending upon the food it will accompany.


Put all the ingredients in a blender or food processor, cover and process until smooth. There will be tiny flecks of dark green in the light green dressing. This will be enough for four main course salads.

I usually add shrimp and/or crab to the lettuce when I serve this. This dressing makes great seafood dip and is also great for pasta salad.


Thursday, June 4, 2009

Flaky Foundation II


There was a recipe for pie crust in Grandma Emma’s box of old yellowed scraps of paper after all. It was in a small three-fold flyer of recipes from the Valier and Spies Milling Corporation of St. Louis, Mo. After a few minutes of on-line research I discovered that Valier and Spies merged with a Kansas milling company in 1927.

In 1927 not only was Grandma Emma making pie dough but the teenage girl who, many years in the future, would become my mom was working on her pie making skills too. So with the spirit of both of those ladies hovering over my keyboard here is how to roll and shape a pie crust.


Shape about a quarter of the cold dough into a flattened disk about 5 inches in diameter and 1 inch high. Return the remaining dough to the refrigerator. Put the disk on a lightly floured surface, marble or granite are best but wood, stainless, glass, and non-stick plastic mats work well too.


Begin rolling from the center of the disk to the outside edges. I start vertically and then switch to horizontally and diagonally. Use a pastry scraper or a pancake turner to loosen the dough if it starts to stick. Then sprinkle a little more flour on your rolling surface before you continue.


This is my mom, Ellen coaching her grand-niece, Emma.


Keep rolling until your crust is about one eighth of an inch thick and forms a rough circle.


Then with the help of your pastry scraper, roll the dough around your rolling pin and carefully unroll it over your pie plate.


Gently press the dough into the pie plate taking care not to trap any bubbles of air between the dough and the surface of the plate. Pay particular attention to the intersection of the sides and the bottom of the pie plate.


Trim the edges of the crust even or slightly larger than the rim of the pie plate and put the crust in the refrigerator. Roll the top crust just as you did the bottom. Let’s say you have already mixed up a strawberry rhubarb filling from the recipe in The Taste of Spring post. Remove the bottom crust from the refrigerator and put the filling into it. Roll the top crust around your rolling pin and unroll it over your filling.


Trim the top crust about an inch longer than the bottom crust and fold the excess in and under the bottom crust so you have the bottom crust edge sandwiched between the top crusts.


Use your thumb and index finger to pinch a ridge at regularly spaced intervals around the rim. Cut vents in the top crust with a sharp knife. Brush the crust with a beaten egg white (reserved from making the dough) and sprinkle with about a tablespoon of granulated sugar.
Bake on the lowest shelf of a preheated 400 degree oven for 15 minutes. Reduce the oven temperature to 350 degrees and move the pie to the upper rack. Bake another 30 to 40 minutes until the vents are bubbling.

Monday, June 1, 2009

Flaky Foundation

My paternal grandmother, Emma had a reputation. My dad, my uncles, and even my older neighbors who knew her talked about her. What they said must have been mostly true because they all agreed … she made great pies. One neighbor divulged that when he was a boy Grandma Emma would bake a small pie just for him when she was baking for the family. He was a middle aged man when he told me this but the smile on his face and the wistful look in his eye was that of a 10 year old.

Although I have a box of recipes written in her handwriting none of them are for pie crust or any sort of filling. Since she passed away before my dad met my mom I can only assume that she had the process of pie making committed to memory. So I learned about pie making from my mom who, in her prime, turned out pies worthy of Grandma Emma’s approval.

This photo of Grandma Emma was taken during WWII when my uncle was serving in the Army.


There is something magical about turning out an excellent pie. It transcends basic nourishment and becomes a memorable experience, one that the neighbors might still be talking about long after you are gone. Like all magic it takes a little coaching and a bit of practice but it’s not really difficult and the product is well worth the effort.


So here is my favorite recipe for pie crust along with the coaching.

Pie Crust

4 cups all purpose flour

1 cup cake flour

4 teaspoons sugar

1 teaspoon salt

1 ½ cups lard

2 egg yolks

1 scant cup ice water

All ingredients should be as cold as possible.


Sift together (or use a wire wisk) the flours, sugar and salt. You are essentially making your own pastry flour by adding the cake flour. If your kitchen is hot put the flours in the refrigerator until they are cold.

Ok, a little note about lard. It used to be the evil artery clogging bad guy until “they” discovered that hydrogenated fats were even worse than saturated fats.
Lard is still the very best fat for flaky crusts because its molecular structure forms crystals so large that it has a grainy texture. Make sure that your lard is fresh and very cold. I go as far as measuring it and putting it in the freezer.

Using a pastry blender cut the almost frozen lard into the flour mixture until you have some pieces that are pea sized and some pieces that are slightly larger. I’m old fashioned and don’t like using a food processor.


Put the egg yolks in the measuring cup you were planning to use for the ice water and wisk them with a fork. Add the ice water until you have more than three quarters but less than a full cup. Sprinkle all but a couple tablespoons of the water over the flour and shortening. Blend the dough with that fork.
If it is too crumbly and won’t hold together add the rest of the water but remember to err on the side of dryness. If you add too much water your crust will be tough. This is where practice will get you to Carnegie Hall.


I gather the dough into two balls, flatten them, and refrigerate them overnight or freeze them for the future.

This recipe makes 5 single crusts.
I'll take you through the rolling steps in the next post.